mirror of
https://github.com/sml2h3/ddddocr.git
synced 2025-05-18 01:39:33 +08:00
274 lines
10 KiB
Markdown
274 lines
10 KiB
Markdown

|
||
|
||
# 带带弟弟OCR通用验证码离线本地识别SDK免费开源版
|
||
|
||
# 当前版本为1.4.11 (插一下广告,自己的GPT平台:https://01.gs,模型陆续增加中,欢迎使用)
|
||
|
||
## 下一版本更新计划,重新训练 中英数识别模型,即将支持自定义划定输出范围,如纯英文/纯数字/部分英文+部分数字/特殊符号/中文/各种混合等等,如果有已经标注好的数据也可以发送邮件(sml2h3@gmail.com)与我分享
|
||
|
||
## 1.4.11 更新时间2024.01.10
|
||
|
||
新增对透明黑色png格式图片得识别支持: `classification` 方法 新增 `png_fix` 参数,默认为False
|
||
|
||
## 1.4.3更新内容
|
||
|
||
本次升级的主要原因为,[dddd_trainer](https://github.com/sml2h3/dddd_trainer) 的开源进行适配,使[dddd_trainer](https://github.com/sml2h3/dddd_trainer) 训练出的模型可以直接无缝导入到ddddocr里面来使用
|
||
|
||
### 支持使用ddddocr调用 [dddd_trainer](https://github.com/sml2h3/dddd_trainer) 训练后的自定义模型
|
||
|
||
[dddd_trainer](https://github.com/sml2h3/dddd_trainer) 训练后会在models目录里导出charsets.json和onnx模型
|
||
|
||
如下所示,import_onnx_path为onnx所在地址,charsets_path为onnx所在地址
|
||
```python
|
||
import ddddocr
|
||
|
||
ocr = ddddocr.DdddOcr(det=False, ocr=False, import_onnx_path="myproject_0.984375_139_13000_2022-02-26-15-34-13.onnx", charsets_path="charsets.json")
|
||
|
||
with open('888e28774f815b01e871d474e5c84ff2.jpg', 'rb') as f:
|
||
image_bytes = f.read()
|
||
|
||
res = ocr.classification(image_bytes)
|
||
print(res)
|
||
|
||
```
|
||
|
||
# 捐赠 (如果项目有帮助到您,可以选择捐赠一些费用用于ddddocr的后续版本维护,本项目长期维护)
|
||
|
||

|
||

|
||
|
||
# 赞助合作商
|
||
|
||
| | 赞助合作商 | 推荐理由 |
|
||
|------------------------------------------------------------|------------|--------------------------------------------------------------------------------------------------|
|
||
|  | [YesCaptcha](https://yescaptcha.com/i/NSwk7i) | 谷歌reCaptcha验证码 / hCaptcha验证码 / funCaptcha验证码商业级识别接口 [点我](https://yescaptcha.com/i/NSwk7i) 直达VIP4 |
|
||
|  | [Malenia](https://malenia.iinti.cn/malenia-doc/) | Malenia企业级代理IP网关平台/代理IP分销软件 |
|
||
|
||
# 1.4.0版本更新内容
|
||
|
||
本次更新新增了两种滑块识别算法,算法非深度神经网络实现,仅使用opencv和PIL完成。
|
||
|
||
## 算法1
|
||
小滑块为单独的png图片,背景是透明图,如下图
|
||
|
||

|
||
|
||
然后背景为带小滑块坑位的,如下图
|
||
|
||

|
||
|
||
```python
|
||
det = ddddocr.DdddOcr(det=False, ocr=False)
|
||
|
||
with open('target.png', 'rb') as f:
|
||
target_bytes = f.read()
|
||
|
||
with open('background.png', 'rb') as f:
|
||
background_bytes = f.read()
|
||
|
||
res = det.slide_match(target_bytes, background_bytes)
|
||
|
||
print(res)
|
||
```
|
||
*提示:如果小图无过多背景部分,则可以添加simple_target参数, 通常为jpg或者bmp格式的图片*
|
||
```python
|
||
slide = ddddocr.DdddOcr(det=False, ocr=False)
|
||
|
||
with open('target.jpg', 'rb') as f:
|
||
target_bytes = f.read()
|
||
|
||
with open('background.jpg', 'rb') as f:
|
||
background_bytes = f.read()
|
||
|
||
res = slide.slide_match(target_bytes, background_bytes, simple_target=True)
|
||
|
||
print(res)
|
||
```
|
||
## 算法2
|
||
一张图为带坑位的原图,如下图
|
||
|
||

|
||
|
||
一张图为原图,如下图
|
||
|
||

|
||
|
||
```python
|
||
slide = ddddocr.DdddOcr(det=False, ocr=False)
|
||
|
||
with open('bg.jpg', 'rb') as f:
|
||
target_bytes = f.read()
|
||
|
||
with open('fullpage.jpg', 'rb') as f:
|
||
background_bytes = f.read()
|
||
|
||
img = cv2.imread("bg.jpg")
|
||
|
||
res = slide.slide_comparison(target_bytes, background_bytes)
|
||
|
||
print(res)
|
||
```
|
||
|
||
## 更新内容2
|
||
添加全局ocr关闭参数,初始化时传入
|
||
|
||
`dddd = ddddocr.DdddOcr(ocr=False)`
|
||
|
||
则为关闭ocr功能,如果det = True,则会自动关闭ocr
|
||
|
||
|
||
# 1.3.1版本更新内容
|
||
|
||
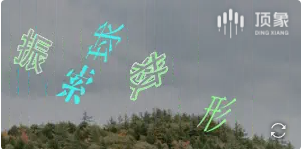
想必很多做验证码的新手,一定头疼碰到点选类型的图像,做样本费时费力,神经网络不会写,训练设备太昂贵,模型效果又不好。
|
||
|
||
市场上常见的点选类验证码图片如下图所示
|
||
|
||
|
||

|
||
|
||

|
||
|
||
|
||
|
||

|
||
|
||
那么今天,他来了,ddddocr带着重磅更新大摇大摆的走来了。
|
||
# 简介
|
||
ddddocr是由sml2h3开发的专为验证码厂商进行对自家新版本验证码难易强度进行验证的一个python库,其由作者与kerlomz共同合作完成,通过大批量生成随机数据后进行深度网络训练,本身并非针对任何一家验证码厂商而制作,本库使用效果完全靠玄学,可能可以识别,可能不能识别。
|
||
|
||
ddddocr奉行着开箱即用、最简依赖的理念,尽量减少用户的配置和使用成本,希望给每一位测试者带来舒适的体验
|
||
|
||
项目地址: [点我传送](https://github.com/sml2h3/ddddocr)
|
||
|
||
# 更新说明
|
||
|
||
本次更新其实分为两部分,其中有一部分是在1.2.0版本就已经更新了,但是在这里还是有必要提一下的。
|
||
|
||
## 第一部分 OCR识别部分
|
||
|
||
在1.2.0开始,ddddocr的识别部分进行了一次beta更新,主要更新在于网络结构主体的升级,其训练数据并没有发生过多的改变,所以理论上在识别结果上,原先可能识别效果的很好的图形在1.2.0上有一小部分概率会有一定程度的下降,也有可能原本识别不好的图形在1.2.0之后效果却变得特别好。
|
||
测试代码:
|
||
|
||
|
||
```python
|
||
import ddddocr
|
||
|
||
ocr = ddddocr.DdddOcr()
|
||
|
||
with open("test.jpg", 'rb') as f:
|
||
image = f.read()
|
||
|
||
res = ocr.classification(image)
|
||
print(res)
|
||
```
|
||
通过在初始化ddddocr的时候使用beta参数即可快速切换新模型
|
||
|
||
```python
|
||
import ddddocr
|
||
|
||
ocr = ddddocr.DdddOcr(beta=True)
|
||
|
||
with open("test.jpg", 'rb') as f:
|
||
image = f.read()
|
||
|
||
res = ocr.classification(image)
|
||
print(res)
|
||
```
|
||
|
||
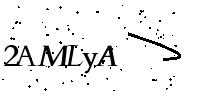
OCR部分应该已经有很多人做了测试,在这里就放一部分网友的测试图片。
|
||
|
||

|
||

|
||

|
||

|
||
|
||

|
||

|
||

|
||

|
||

|
||

|
||

|
||
等等更多图片等你测试哟~
|
||
|
||
## 第二部分 目标检测部分
|
||
在本次1.3.0的更新中,目标检测部分隆重登场!
|
||
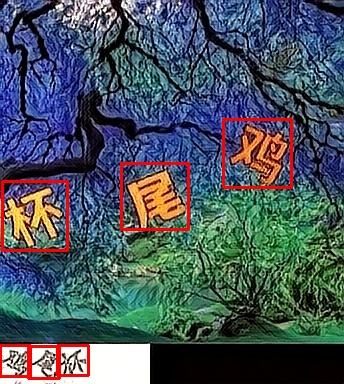
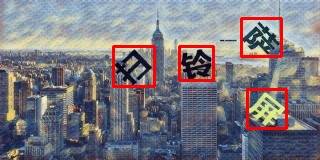
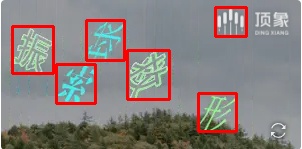
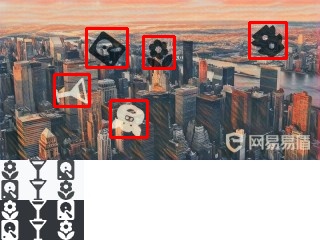
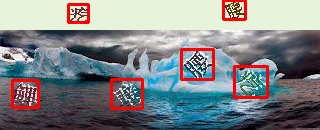
目标检测部分同样也是由大量随机合成数据训练而成,对于现在已有的点选验证码图片或者未知的验证码图片都有可能具备一定的识别能力,适用于文字点选和图标点选。
|
||
简单来说,对于点选类的验证码,可以快速的检测出图片上的文字或者图标。
|
||
|
||
|
||
```python
|
||
import ddddocr
|
||
import cv2
|
||
|
||
det = ddddocr.DdddOcr(det=True)
|
||
|
||
with open("test.jpg", 'rb') as f:
|
||
image = f.read()
|
||
|
||
poses = det.detection(image)
|
||
print(poses)
|
||
|
||
im = cv2.imread("test.jpg")
|
||
|
||
for box in poses:
|
||
x1, y1, x2, y2 = box
|
||
im = cv2.rectangle(im, (x1, y1), (x2, y2), color=(0, 0, 255), thickness=2)
|
||
|
||
cv2.imwrite("result.jpg", im)
|
||
|
||
```
|
||
|
||
举些例子:
|
||
|
||
|
||
|
||
|
||
|
||

|
||

|
||
|
||
|
||
以上只是目前我能找到的点选验证码图片,做了一个简单的测试。
|
||
|
||
# 安装
|
||
|
||
## 环境支持
|
||
|
||
`python <= 3.9`
|
||
|
||
`Windows/Linux/Macos..`
|
||
|
||
暂时不支持Macbook M1(X),M1(X)用户需要自己编译onnxruntime才可以使用
|
||
|
||
## 安装命令
|
||
|
||
`pip install ddddocr`
|
||
|
||
以上命令将自动安装符合自己电脑环境的最新ddddocr
|
||
|
||
## 拓展 一键部署ddddocr api,支持docker部署
|
||
|
||
[github](https://github.com/sml2h3/ocr_api_server)
|
||
|
||
[gitee](https://gitee.com/fkgeek/ocr_api_server)
|
||
|
||
## 爬虫框架推荐
|
||
|
||
[feapder](https://github.com/Boris-code/feapder)
|
||
|
||
[crawlab](https://github.com/crawlab-team/crawlab)
|
||
|
||
# 交流群 (个人微信太懒了不一定会通过)
|
||
|
||

|
||

|
||
|
||
# 主要贡献者
|
||
|
||
<span style="margin: 0 5px;" ><a href="https://github.com/kerlomz" ><img src="https://cdn.wenanzhe.com/img/16838877.jpg!/scale/50" /></a></span>
|
||
|
||
## Star 历史
|
||
|
||
[](https://star-history.com/#sml2h3/ddddocr&Date)
|